Instructions and Advice
Setting up your MyGovID
MyGovID is used to verify your identity online and used as a Digital Identity. It can be used to unlock certain government online services. Never give another person access to your MyGovID.
Before you start, you will need the following:
1. A smart device that has access to Apple App Store or Google Play
2. An email address: recommended to be a personal Email address and not a work or shared email.
3. To be 15 years of age or over.
Setting up your MyGovID takes three easy steps:
1. Download the MyGovID app, available from the App Store or Google Play.
2. Enter your details
Follow the prompts, you will need to enter your full name, date of birth and email address.
3. Choose your identity strength and add your identity documents
You will need to enter your personal details and verify Australian identity documents.
Depending on what you want to access will determine the strength of identity required for your account. Visit: https://www.mygovid.gov.au/where-to-use to see the identity strength minimums.
Tip: To avoid name mismatch errors, upload your identity documents in the following order: passport, driver’s licence, birth certificate, visa, Medicare card. If you have trouble scanning your identity documents, you should enter the details manually.
Reference: https://www.mygovid.gov.au/set-up
The government has initiated a new system that attaches a unique identifying number to an individual who is a company director. If you are a company director you will need a director identification number by November 2022. You can apply for a director ID from November 2021.
What is a Director Identification Number?
A director has one number permanently attached to them, and this is used for identification purposes for any or all companies they are a director of. The new Australian Business Registry Services (ABRS) will administer the director ID register, which will gradually integrate all government business registers into one easily accessible register with greater security. The director ID numbers will mean better transparency of appointed directors of companies but also increased privacy protections.
What Do You Need To Do?
When you must apply for your director ID depends on the date you become a director.
- Existing directors have until November 2022 to register for a director ID number.
- New directors appointed between 1 November 2021 and 4 April 2022 must apply within 28 days of being appointed as a director.
- New directors appointed from 5 April 2022 must obtain a director ID number before a director appointment.
- Prospective directors can apply for a director ID up to 12 months ahead of the appointment.
Application Process
The easiest and fastest way to apply is online via ABRS – https://www.abrs.gov.au/director-identification-number/apply-director-identification-number
- You’ll need a myGovID account to apply for your director ID number online. This creates an authenticated digital identity you can use when accessing government services online.
- Apply through Australian Business Registry Services, (ABRS). You’ll need proof of identity documents such as tax file number, ATO notice of assessment or bank details.
- You’ll then need to complete the application process from the ABRS webpage, which will link your myGovID account to the application. If the application is verified successfully, you’ll receive your director ID straight away.
- Once you receive your director ID, please advise CBAS of this number so we may update your records.
Directors – you will have to complete this process yourself as you must verify your identity as part of the application – nobody else can apply on your behalf.
You can also apply via paper form or telephone.
What Next?
Start gathering your identification documents and apply now. Set up your myGovID, if you haven’t already, and take note of when you need to get your ID number. There’s no reason not to get your ID number now – be proactive! This is also a great time to update your ABN details and ASIC details.
Talk to us if you’d like to know more about director ID numbers and company director obligations.
Set up your access to the Online Business Portal – Sole Trader or Eligible Individual Associate
These instructions apply to you if you are a:
- a sole trader
- an eligible individual associate listed on an Australian business number (ABN) in the Australian Business Register (ABR), for example
- a trustee
- a director
- a public officer
- a partner
- an office bearer of a club or association
What you need to get started:
Before you get started, check that your device is compatible. You’ll need a smart device with:
■ iOS 10 or later for Apple devices, or
■ Nougat 7.0 or later for Android devices.
Step 1: Set up your myGovID
Steps Available In Set Up MyGovID Tab
Step 2: Log in to RAM and link your business
You must be the principal authority (business owner or listed associate on the ABR) to link your business’s ABN to your myGovID.
To link your business to your myGovID:
■ from your computer or smart device, go to info.authorisationmanager.gov.au
■ log in to RAM using your myGovID
■ select Link my business to find your business and follow the prompts to add the required information.
If you can’t find your business in RAM, you may need to update your details on the ABR. You can do this through your tax professional or by phoning the ATO on 13 28 66.
For help with linking your business in RAM, visit info.authorisationmanager.gov.au/help – this page has solutions to the most common issues (and error codes).
Step 3: Log in to the Business Portal
You’ve now finished setting up myGovID and RAM.
When you log into the Business Portal at bp.ato.gov.au a four-digit code will appear at the login screen. You need to enter this code in the myGovID app.
Tip: The myGovID app is only used for logging in.
Reference: https://www.ato.gov.au/Business/Bus/Set-up-your-access-to-Online-services-for-business/
Set up your access to the Online Business Portal – Primary Person
a Primary person who holds one of the following roles:
-
- company – the director or public officer for the corporate trustee or subsidiary company
- government entity – the authorised contact
- Australian charity or not-for-profit organisation – director or public officer of the corporate trustee or subsidiary company or the responsible person
- deceased estate – the executor after probate is granted
- unincorporated association – the office holder.
What you need to get started:
Before you get started, check that your device is compatible. You’ll need a smart device with:
■ iOS 10 or later for Apple devices, or
■ Nougat 7.0 or later for Android devices.
Step 1: Set up your myGovID
Steps Available In Set Up MyGovID Tab
Step 2: Log in to RAM and link your business
If you’re a primary person or unable to link online as a sole trader or eligible individual associate, you’ll need to contact the ATO to link your business in RAM.
To link seven or fewer ABNs:
- phone 1300 287 539 and select option 3 to complete a proof of identity check
- checks will be completed to confirm your association to the business
- once confirmed, you’ll receive an email with an authorisation code and summary of the authorisation request
- log in to RAM to accept the request and complete the link.
For help with linking your business in RAM, visit https://info.authorisationmanager.gov.au/principal-authority#Linking_as_a – this page has solutions to the most common issues (and error codes).
Step 3: Log in to the Business Portal
You’ve now finished setting up myGovID and RAM.
When you log into the Business Portal at bp.ato.gov.au a four-digit code will appear at the login screen. You need to enter this code in the myGovID app.
Tip: The myGovID app is only used for logging in.
Reference: https://www.ato.gov.au/Business/Bus/Set-up-your-access-to-Online-services-for-business/
Online Portal – Authorising employees and others in RAM
Use RAM to authorise others to act on behalf of your business. For example, if you have employees who access the Business Portal on behalf of your business.
Before you authorise staff, check they have set up their myGovID. As myGovID belongs to them and not the business, your staff should set it up using their personal email address.
When you authorise an employee in RAM, you need to enter their legal name (which matches the name used to set up their myGovID) and an email address. They will then receive an authorisation request by email and have seven days to accept it using their myGovID.
Tip: If you need to customise someone’s access and permissions, you will be directed through RAM to use Access Manager.
The process for authorising tax or BAS agents outside your business (for example, tax professionals who are not your employees) is different. Your agent will contact the ATO to work on your behalf and access your records through their online services. This means you won’t use RAM to authorise them.
Using software to report to the ATO
If you use cloud-based Standard Business Reporting (SBR) enabled software, you don’t need to take additional steps – your software provider will do this for you. If you use desktop or locally hosted software (not cloud), you may need to undertake additional steps – your software provider will guide you through this process.
Preparing to Lodge
During the year you will need to keep records of all contractor’s including the following information:
- Name
- Address
- Australian Business Number (ABN)
- Amount you paid, including GST
Visit: https://www.ato.gov.au/Business/Reports-and-returns/Taxable-payments-annual-report/Lodge-your-TPAR/TPAR-contractor-details-to-report/ to see the TPAR contractor details you must report.
Lodging your TPAR
To ensure you are meeting you Lodgement obligations, lodgement can be completed through the following services:
- Accounting Software- if available
- MyGov for Sole Traders
- ATO Online Services for Businesses
- Tax Agent- Complete Business & Accounting Services
- Paper form
Lodging through MyGov:
- Open your MyGov (ensure you have your MyGov linked to the ATO)
- Select Tax, Lodgments and then Taxable payments annual report
- This service allows you to:
-
-
- Save and resume your draft TPAR before lodging
- Confirm previous lodgment dates and access receipt ids in the History section
-
-
Lodging through ATO Online services for Businesses:
- Open ATO Services for Businesses
- Select Lodgments, then Taxable payments annual reporting
- This service allows you to:
-
-
- Save and resume your draft TPAR before lodging
- Confirm previous lodgment dates and access receipt ids in the History section
-
-
If you do not need to lodge, see TPAR Non-lodgment advice.
To update or correct the payee (contractor) details, see Amend a lodged TPAR.
Return to Work (SA) Employer Remuneration
If you are a business registered with Return To Work SA (RTWSA), you will need to provide an employer remuneration return no later than the 15th September 2023.
The employer remuneration return allows RTWSA to accurately calculate your insurance premium for the coming year. Should this form not be submitted by the due date listed above, the insurance premium can be calculated at an incorrect rate and you may find you receive a signification bill or refund at the end of the year.
Please be advised the first payment is due by the 7th October 2023.
You can lodge the RTWSA Employer Remuneration return via the online portal listed below, using an existing account, or creating a new account by clicking ‘Register here’:
https://auth.rtwsa.com/my.policy
For more information on:
- What do I include/ provide in my employer remuneration return?
- Paying your premium
- Exemptions
Please visit the RTWSA Site, https://www.rtwsa.com/insurance/insurance-with-us/employer-remuneration-return.
We are more then happy to assist you with this process, should you have any concerns relating to the above please do not hesitate to contact us.
Finalising Single Touch Payroll
As an employer, you are no longer required to provide your employees with payment summaries for the given financial year, as this information is now processed through Single Touch Payroll (STP), in your relevant payroll software.
Single Touch Payroll needs to be fully processed and finalised for the 2023 financial year, through your nominated payroll software, by the 14th of July 2023. It is highly recommended you finalise by this date, so your employee’s can lodge their income tax returns.
Before making your finalisation declaration, you must ensure the STP information you are declaring to the ATO is correct. To do this, please utilise the attached checklist that will take you through the following steps in finalising your 2023 end of financial year payroll:
Step 1: Review
Step 2: Reconcile
Step 3: Process
Step 4: Adjustments (if necessary)
Step 5: Superannuation
The attached checklist is specific for those who file their STP through Xero’s Payroll Software. However, for those who file through a different software, like MYOB Australia, please still take use of the checklist to ensure you review and reconcile your STP correctly, prior to processing the finalisation declaration.
Please note that your employees can access their year-to-date and end-of-year income statement, online, through MyGov or talk to their registered tax agent. Your employee’s must ensure they check their personal details and if necessary, update these details with both you and the ATO, as incorrect personal details may prevent them from seeing their STP information in MyGov. Once you have finalised your STP, the status of your employee’s income statements in MyGov should change from ‘Not Tax Ready’ to ‘Tax Ready’.
For more information, please visit the following ATO websites:
- https://www.ato.gov.au/business/single-touch-payroll/start-reporting/end-of-year-finalisation-through-stp/
- https://www.ato.gov.au/Business/Single-Touch-Payroll/Need-more-time/Deferrals/
If you require further assistance with finalising your STP, please contact our office.
Superannuation Guarantee Payments
If your business pays employee(s), generally speaking your business will also be liable to pay superannuation guarantee on ordinary earnings, at the statutory rate.
As an employer, you must pay your superannuation guarantee liabilities on a quarterly basis at a minimum, with the following due dates for payment which must be strictly adhered to;
- 28 October – Due date for payment of the superannuation guarantee liabilities accrued in the September quarter.
- 28 January – Due date for payment of the superannuation guarantee liabilities accrued in the December quarter.
- 28 April – Due date for payment of the superannuation guarantee liabilities accrued in the March quarter.
- 28 July – Due date for payment of the superannuation guarantee liabilities accrued in the June quarter.
If you do not pay an employee’s superannuation guarantee by the relevant due date, and to the correct fund, you must prepare and lodge a ‘Superannuation Guarantee Charge Statement’ to the Australian Taxation Office, and pay any resulting Superannuation Guarantee Charge. This needs to be done, even if a payment is as little as one day late.
Penalties (SGC’s) of up to 200% will apply to late payments, and will continue to accrue up to the point at which your Superannuation Guarantee Charge Statement is lodged, and all obligations are paid.
Additional to any late fees and penalties, any superannuation guarantee payments made post the payment due date will not be tax deductible.
It is important to note that the superannuation guarantee measures are also applicable to any contractors who are paid mainly for their labour.
Things to consider prior to employing in a workplace:
Due Dates
EOFY PAYG Withholding:
14th July 2023
Annual Superannuation Guaranteed Obligations:
- 28 October – Due date for payment of the superannuation guarantee liabilities accrued in the September quarter.
- 28 January – Due date for payment of the superannuation guarantee liabilities accrued in the December quarter.
- 28 April – Due date for payment of the superannuation guarantee liabilities accrued in the March quarter.
- 28 July – Due date for payment of the superannuation guarantee liabilities accrued in the June quarter.
Return to Work (SA) Employer Remunerations:
To be paid by the 7th day of the month, or in full by the 15th September 2023.
SA Payroll Tax – if applicable
To be paid by the 7th day of the month
Taxable Payments Annual Report (TPAR)
28th August 2023
Fringe Benefits Tax Return (FBT Return)
By Paper
21st May 2023
By Tax Agent
25th June 2023
Paper form in Available Documents below.
Quarterly PAYG Instalment Activity Statements
PAYG Instalment Activity statements are due the 28th of the following month after the quarter.
- 28th October 2022- Lodge and pay for September Quarter
- 28th January 2023- Lodge and pay for December Quarter
- 28th April 2023- Lodge and pay for March Quarter
- 28th July 2023- Lodge and pay for June Quarter
Monthly Business Activity Statements (BAS)
Monthly BAS lodgements and payments are due on the 21st of the following month.
Example:
- 21st October 2022- Lodge and pay September Monthly BAS
- 21st November 2022- Lodge and pay October Monthly BAS
- 21st December 2022- Lodge and pay November Monthly BAS
Exception:
- 21st January 2023- Lodge and pay December Monthly BAS – Except for businesses with up to $10 million turnover who report GST monthly and lodge electronically.
- 21st February 2023- Lodge and pay December Monthly BAS- for businesses with up to $10 million turnover who report GST monthly and lodge electronically.
Quarterly Business Activity Statements (BAS)
Lodged by Business
- 28th October 2022- Lodge and pay September Quarter BAS
- 28th February 2023- Lodge and pay December Quarter BAS
- 28th April 2023- Lodge and pay March Quarter BAS
- 28th July 2023- Lodge and pay June Quarter BAS
Lodged by Tax Agent
- 25th November 2022- Lodge and pay September Quarter BAS
- 28th February 2023- Lodge and pay December Quarter BAS
- 26th May 2023- Lodge and pay March Quarter BAS
- 11th August 2023- Lodge and pay June Quarter BAS
Tax Return Notes:
- 31st October 2023- Lodge tax returns for all entities if one or more prior year returns were outstanding as at 30 June 2023. Note: This means all prior year returns must be lodged.
Xero
Importing bank statements into Xero
https://central.xero.com/s/article/Import-a-CSV-bank-statement
As extracted from the above article, importing a bank statement into Xero is a 3. Step Process consisting of the following:
- Create the CSV File
- Prepare the data in the file
- import the file into Xero
Step 1. Create the CSV File
Download statement from online banking application.
- Open your banking application, and download the transitions from your bank account in a CSV file format. Please note, if you have multiple bank accounts, download a separate file for each account.
- If the file contains more than 1,000 transactions, you will need to split transactions, and create two separate documents.
- Save the document in .csv format.
If you cannot download a CSV file, create your own, using the template titled ‘Bank Statement CSV File Template’ in available documents section below.
2. Prepare the data in the file
Use Headings
The Bank Statement CSV file requires heading, to assist in the mapping process in Xero.
If the CSV file from your bank does not have a headings row, insert one. It must be in row 1 and each column name should be unique.
Delete data not required
The following fields are not required, and can be deleted from the file:
- Empty rows
- Columns containing opening and closing balance
- The bank account number if it shows in the import file
Enter data into the fields
you will see in the document Mandatory fields, these are marked with an Asterix.
Below is an example of the recommended information to be included in your CSV file:
- Date – Use the format DD/MM/YYYY or MM/DD/YYYY.
- Amount – Both income and expense amounts must be in the same column. Show income as positive amounts and expenses as negative amounts with a negative sign in front of the amount, for example -30.00. Don’t include currency symbols or use commas to show decimal places.
- Payee – (Recommended) If the payee is an existing contact in Xero, make sure the name in your file matches exactly with the contact name in Xero to avoid creating duplicates.
- Description – Enter detail you want to include as a description on your transaction.
- Reference – Enter detail you want to include as a reference on your transaction.
- Cheque number – Enter the cheque number if applicable.
Once you have reviewed and adjusted the information as required you are now ready to save and import the file.
3. Import the file into Xero
- In the Accounting menu, select Bank accounts.
- For the bank account you want to import the file into, click Manage Account, then click Import a Statement.
- Click Browse, select the saved CSV file, then click Open.
- Click Import.
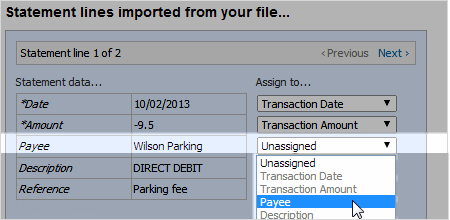
- If prompted, assign the columns in your import file to the matching bank statement fields.
- Click Save.
Assigning columns to statement fields
Creating Invoices
With any business, invoicing clients is a necessity. Using Xero invoicing makes a complicated process easy and seamless. The following information is extracted from the above article.
How to create an invoice:
- Open your Xero Account
- Using either the homepage “New Sales Invoice” or from the header, click the quick launch icon
and select Invoice.
- In the To field, enter the name of the customer you’re invoicing. If there’s a previously approved or paid invoice for the contact, you can add the last item lines from that invoice to the new one.
- Complete the remaining invoice details. You must fill out the Due date, Description, Account, and Tax Rate fields to be able to approve the invoice.
- (Optional) You can drag and drop the item lines to reorder them.
- Save the invoice, send it for approval, or approve it yourself.
Please note, to approve and send an invoice, you’ll need one of the below user roles:
- Adviser
- Standard
- Invoice only – approve and pay (sales and purchases)
- Invoice only – purchases (purchase orders and bills)
- Invoice only – sales (quoting and invoicing)
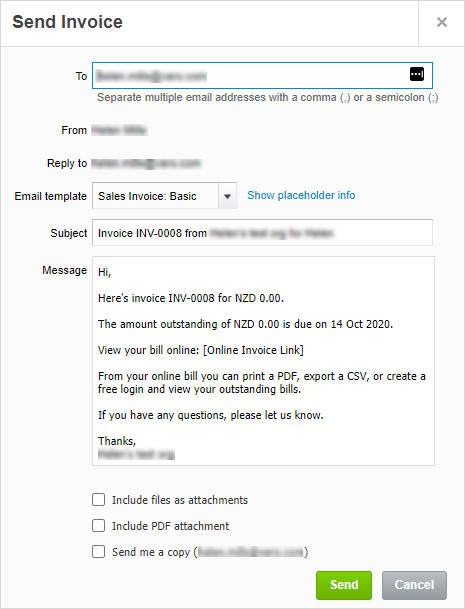
To Email an Invoice
- Open the invoice you want to email.
- Click Email.
- Update the information in the Send window. If you’re sending the invoice to multiple email addresses, separate each address with a comma or semicolon.
- (Optional) Tick either:
- Include files as attachments to email any additional files attached to the invoice.
- Include PDF attachment- Recommended to include a PDF copy of the invoice.
- Mark as sent to mark the invoice as being sent.
- Send me a copy to send yourself a copy of the email.
5. Click Send
Creating Bills in Xero
https://central.xero.com/s/article/Add-and-approve-bills
To create a bill in Xero is an easy process, that saves you time and removes unnecessary paper in your office. You can do it from your phone, anywhere you have internet access. The below information is extracted form the above article.
We highly recommend using a third party technology to scan in your receipts, to ensure you have an electronic copy, in the instance you misplace the original. Talk to us today to discuss an option best suited to your needs.
Manually Adding a bill
1. In the Business menu, click Purchase overview or you can also add a bill from the create new icon or from a contact’s details.
2. On the Purchases Overview screen click the arrow next to New and select Bill.
3. Enter the information into the bill fields.
4. Add the items you need to pay for. You can drag and drop the item lines to reorder them.
5. (Optional) Click the file icon to upload items related to the bill.
6. (Optional) If you want a customer to pay for a billable expense, click Assign expenses to a customer.
7. (Optional) If you use Xero Projects and have the projects standard or projects admin user role, click Assign expenses to a project to link the bill to a project. Start typing to search for a project, select the project and line items you want to link, then click Assign and OK.
8. Save the bill, send it for approval, or approve it yourself.
To add and approve bills, you will need one of the following user roles:
- Adviser
- Standard
- Invoice only + purchases
- Invoice only + approve & pay
If you have the invoice only + draft user role, you can add a draft bill but you can’t approve it.
9. (Optional) Click Allocate and assign customer credit to the bill if you’ve approved it.
10. (Optional) Click Add Note to enter additional information for the bill.
Approve draft bills
- In the Business menu, select Purchase overview.
- Under Bills, click the Draft tile to view all draft bills.
- (Optional) Open bills to check their details and make changes before you approve them. Click Approve to approve a single bill.
- Select the checkbox next to one or more bills, then click Approve.
How to Reconcile Bank Statements
Once you have created and approved all bills, you can start the reconciling process. We highly recommend ensuring you have entered all the transactions into Xero. These might include invoices, bills, credit notes, expense claims, or cash transactions.
Your aim is to match each statement line in the bank account to an existing transaction in Xero, or create a transaction during the reconciliation process.
For more information watch the short video above for step by step instructions.
How to create a Quote and turn the Quote into an Invoice
Quickly create a quote on the go for existing or new clients!
Watch the quick video above, which highlights the how to’s for creating a quote and turning that quote into an invoice.
Or for Step by Step instructions visit: https://central.xero.com/s/article/Create-a-quote-AU#Createanewquote
